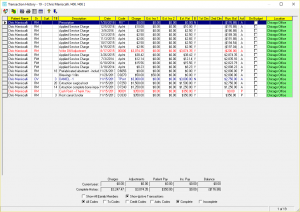
Transaction History Screen – Overview
The title bar at the top of the History screen will display the number of transactions that are in the History screen, the patient’s name, their ID number, and the ID number of the Family Head.
You can rearrange columns by clicking one time on a column title (shown in yellow) and then clicking again and dragging it to a new position. You can also click and drag the vertical lines between columns to resize the width. Tip: You may want to do this before printing the History screen!
The History screen will show the patient name, doctor of service, treatment, charges, payment amounts, insurance estimated amounts, insurance claim information, and running balances.
Note: Pre-existing and New Finding treatment that was entered from the Restorative Chart is always excluded from the patient’s Transaction History screen.
The “Act” column will be marked “P” if the transaction is from the History screen or “A” if it is from their Active screen. You will only see the “A” for Active screen if you have marked the box at the bottom to “Show Active Transactions”.
If you remove the “X” from “Show All Family Members”, the History screen will also show any distribution of payments for this patient from other family members. These distributions will be shown automatically so that the Running Balance amount will be accurately calculated. They will appear in red.
If you mark “Show All Family Members” on the History screen of a patient with an “S” in their Account Type, you will receive a message. MOGO will let you know that this patient’s balance is maintained separately from the rest of the family. Note: An S in the Account Type field is used to send a separate statement to a family member.
If you are showing “All Family Members”, then the individual payment distributions will not be shown. This is because all payments are already included automatically when you “Show All Family Members”.
If you mark any of the boxes at the bottom of the screen, they will remain marked for all patients. For example, if you mark “Show Active Transactions”, it will also be marked when you go to another patient’s Transaction History screen.
You can right click on any treatment or payment in the History screen and select View Distributions to see a Distribution Detail window. This is a great way to quickly see how treatment and payments were linked.
There is a Budget column in the Transaction History screen. A checkmark will be next to treatment that is part of an active Budget Plan. Once the Budget Plan is completed paid, the checkmark will be removed. Tip: Mark the box next to “Show Active Transactions” in the History screen to see all active Budget Plan treatment.
There is a ![]() Budget Plan icon in the toolbar. This will open the Budget Plan Setup screen.
Budget Plan icon in the toolbar. This will open the Budget Plan Setup screen.
The Location column is used by offices who have multiple office locations.

