Printing Receipts – Instructions
(Click image for full size)
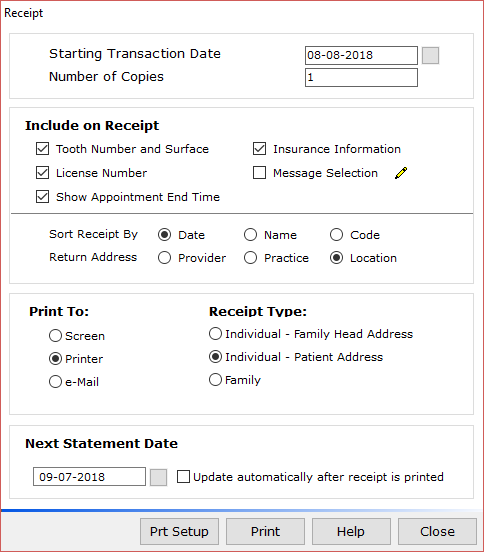
Follow these steps to print a Receipt:
- Click on the
 Receipt icon on the Transaction screen. You can also click on Print and select Receipt on the menu bar.
 - Starting Transaction Date
- Click in the Starting Transaction Date window if you would like to change the starting date for treatment that will be listed on the Receipt. You can then type the date in the box. Any treatment or entries made prior to the starting date will be shown as a previous balance. This field will default to the current date.
- You can also click on the calendar icon which is shown next to the Starting Transaction Date window. Use the left mouse button to select the starting month, day, and year. The date you select will be indicated on the bottom of the Calendar window. Click on OK and the date you selected will be shown in the Starting Date window.
- Number of Copies
- Click on the Number of Copies window if you need more than one copy.
- Include on Receipt
- Include Tooth No. and Surface
- Click on Yes if you would like to include the tooth number and surface columns on the Receipt.
- License Number
- if you would like the provider’s license number to appear on the Receipt. This would be useful if the patient is sending the Receipt to their insurance company.
- Show Appointment End Time
- If you do not mark this box, only the start time for the appointment will be shown on the Receipt.
- Insurance Information
- Click on Yes to include insurance pending amounts on the Receipt. This is the insurance estimated amount from the patient Transaction screen. If you are printing a family Receipt, this will be the total amount of estimated insurance for all family members.
- Note: If you do not choose to show the insurance pending amount the entire balance on the account will be shown as the patient portion.
- Message Selection.
- If you mark this box, a window will open after you send the Receipt to the printer. You will then select from a Message window to add additional messages to a Receipt. The messages shown in this window are the General messages that you created. These are the messages that vary for each patient.
- Include Tooth No. and Surface
- Sorting
- The Receipt can be sorted by Date, Name or Code. This would be useful if you were printing a family Receipt.
- Return Address
- The Return Address on the receipt can be populated with the Provider, Practice, or Location address.
- Print To
- Screen
- Printing the receipt to the screen allows you to view a preview of the receipt prior to printing it. This is very helpful if you are unsure of how the settings chosen on the Receipt window will affect the printed receipt. If you don’t like the way a setting affects the receipt you can always close out of the preview and make the changes without wasting paper.
- Printer
- This option will send the receipt directly to the printer to be printed.
- e-mail
- A newer feature in MOGO is the ability to send your receipts to your patient’s email address instead of printing. When selecting the e-mail option the Print button will change to Send.
- Screen
- Receipt Type
- You can select Individual Family Head Address, Individual Patient Address, or Family Receipt.
- The Individual – Family Head Address type will print the receipt for the patient whose transaction screen you were on when you clicked the receipt icon. The address will be that patient’s Family Head’s address.
- When printing a Receipt by individual, the last transaction line will indicate “Payment to/from other accounts”. This will show a total payment amount that has been distributed to this patient from other family members or from non-family members.
- The Individual – Patient Address type will print the receipt for the patient whose transaction screen you were on when you clicked the receipt icon. The address will be that patient’s address.
- When printing a Receipt by individual, the last transaction line will indicate “Payment to/from other accounts”. This will show a total payment amount that has been distributed to this patient from other family members or from non-family members.
- The Family Receipt prints the receipt for all family members. It will be addressed to the Family Head.
- Note: If the patient has an S in their Account Type field, you will not have the option to print a Family Receipt.
- The Individual – Family Head Address type will print the receipt for the patient whose transaction screen you were on when you clicked the receipt icon. The address will be that patient’s Family Head’s address.
- You can select Individual Family Head Address, Individual Patient Address, or Family Receipt.
- Next Statement Date
- The Next Statement Date box will automatically indicate a date of one month from today. Click in the box next to Update automatically after Receipt is printed to update the Next Statement Date to one month from today. The patient will not receive a statement until that date. If you print a Family Receipt, MOGO will ask if you want to update the Next Statement Date for all family members. This is used mainly when Daily Billing.
Note: If there is not an X in the box, MOGO will ask “Do you want to change this patient’s Next Statement Date to [xx-xx-xxxx]” after printing or sending the receipt. If you are doing daily billing, you will want to answer “yes” to this question. Do not update the Next Statement Date if you are doing monthly billing.
- Click on Print to send to the printer. The Receipt will go to the printer if you selected Printer or it will go to the screen for viewing first if you selected Screen.
- Click on Send to send the receipt to the patient’s email address. A preview window will not open.
If you have marked the box for Message Selection, an additional Message window will open so that you can select from a list of General and Service Code Messages. Click in the gray boxes to select from the list of messages.
Note: To select more than one line, hold the [Ctrl] key and click in the gray boxes multi-selection boxes to select. You can click again to unmark if you make a mistake! Messages will print in a 10 point font size.