Patient Transaction Screen Estimated Balances/Provider Information/Budgets & Referrals Information
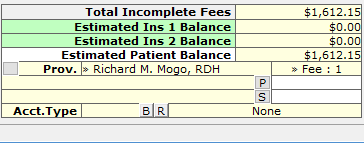
Total Incomplete Fees
- Incomplete treatment totals are listed in the bottom right corner of the Transaction screen.
- Insurance pending amounts are also listed. Any treatment which has not been dated will be listed in this area.
Estimated Ins 1 Balance
- The Estimated Primary Coverage on the Transaction screen is the amount the primary insurance will pay on the incomplete treatment and is pulled from the Est.Ins.1 column.
Estimated Ins 2 Balance
- The Estimated Secondary Coverage on the Transaction screen is the amount the secondary insurance will pay on the incomplete treatment and is pulled from the Est.Ins2 column.
Estimated Patient Balance
- The Estimated Patient balance is the amount the patient will be responsible for on the incomplete treatment and is pulled from the Est. Pat. column.
Provider
- The Provider field on the Transaction screen is the patient’s provider that was selected in the Patient Information screen.
- There is a gray button next to the Provider field so that a temporary provider can be selected. When filing insurance for a temporary provider, MOGO will enter those initials next to the insurance claim line on the Transaction screen.
- Note: The provider on the insurance claim form will still be the provider from the Patient Information screen.
- Once the Transaction screen is closed, it will return to their provider of record from the Patient Information screen.
P(rimary)
- The P (Primary) button on the Transaction screen shows information regarding the primary insurance plan.
- Click once with the left mouse button to access the primary insurance plan window. You can then edit the Primary Insurance Plan’s coverage details.
- Double click with the left mouse button on the name of the employer/insurance company to access the Employer Information editing screen.
- Double click on the remaining primary insurance dollar amount to change information for this patient. For example, you can change Remaining Insurance Benefits or the remaining deductible amount. The changes you make here only affect this patient.
- Tip: If remaining benefits are changed, it will save information in the patient’s Notes regarding the changes that were made as well as the date and login name.
S(econdary)
- The S (Secondary) button on the Transaction screen shows information regarding the patient’s secondary insurance plan.
- Click once with the left mouse button to access the secondary insurance plan window. You can then edit the Secondary Insurance Plan’s coverage details.
- Double click with the left mouse button on the name of the employer/insurance company to access the Employer Information editing screen.
- Double click on the remaining secondary insurance dollar amount to change information for this patient. For example, you can change Remaining Insurance Benefits or the remaining deductible amount. The changes you make here only affect this patient.
- Tip: If remaining benefits are changed, it will save information in the patient’s Notes regarding the changes that were made as well as the date and login name.
Acct. Type
- The Act Type field on the Transaction screen is the patient’s Account Type that was entered on the Patient Information screen.
B (Budget Plan)
- The B (Budget Plan button is in the Transaction screen and Patient Information screens.
- A checkmark is shown on the Budget Plan button on the Transaction screen and Patient Information screen when a patient has an “Accepted” Budget Plan.
- You can view a list of Budget Plan patients from the To Do List. Budget patients are automatically tracked in the To Do List under the Budget Plan tab until the Budget Plan has been completely paid!
- Click on the B button on the Transaction screen to open the Budget Plan window.
- There is a Budget column in the Transaction History screen. A checkmark will be next to treatment that is part of an active Budget Plan. Once the Budget Plan is completed paid, the checkmark will be removed.
R (Refer In/Out)
- The R (Refer In/Out) button in the Transaction screen and Patient Information screen is a quick way to open the combined Refer In/Out List .
- A checkmark on this button means that the patient has been referred in or out.
- Refer In/Out names are automatically tracked in the To Do List.