Sending E-Mail – Compose Message
MOGO’s Digital Communication Suite (DCS) includes a powerful e-mail feature. E-mail can be accessed by clicking on the e-mail icon on the Patient Lookup List.
As you update your patients’ records, ask for their e-mail addresses and cell phone numbers. You can then enter the e-mail address, as well as other numbers, in their Contact Information screen. You can even mark a “preferred contact” number! MOGO’s eReminders allows you to send appointment confirmations and reminders via e-mail and text message!
MOGO’s E-Mail Setup Wizard will help you enter the information required to access your e-mail account. Click here to learn more about Getting Started with E-Mail.
The menu bar on the E-mail screen contains many features that are also shown as icons in the toolbars. The editing features, such as Cut or Copy, are used from the Compose Message screen.
E-mail options will be available if you are logged in as the Supervisor or if you have been given rights to send e-mail. However, anyone can send Statements, Recall Reminders, or Appointment Confirmations via e-mail.
Your system tray will display e-mail notifications on all computers. The notifications include 1) New messages received, 2)messages that need to be sent, and 3)messages that need to be reviewed.
MOGO can automatically send and receive e-mails in the background without opening DCS. The E-mail Options window allows you to enable and set the frequency of this feature.
E-mail is also available in Quick Letters, Appointment Confirmations, Recall Cards, and Statements.
When you click on the ![]() icon on the Patient Lookup List, MOGO’s Digital Communication Suite E-mail screen will open.
icon on the Patient Lookup List, MOGO’s Digital Communication Suite E-mail screen will open.
You can click on the drop-down arrow next to the e-mail icon to select from the following:
- Digital Communication Suite – This is the same screen that opens when you click on the E-mail icon on the Patient Lookup List. Click here to learn more about the icons and menu bar on this screen.
- Send e-mail to [selected patient name] – The Compose Message screen will open and the selected patient name will be connected. You will be asked for their e-mail address if you have not already entered one in their Contact Information screen. Otherwise, their e-mail address will be shown in the “To” field.
- Compose e-mail – Opens the Compose Message screen. A patient name will not be connected.
- Send & Receive e-mail – To quickly send and receive e-mails without opening the Digital Communication Suite (DCS).
- Options – MOGO can automatically send and receive e-mails in the background without opening DCS. The E-Mail Options window allows you to enable and set the frequency of this feature.
- Setup Email Accounts – Opens the Email Setup Wizard.
Compose Message
After clicking on the New icon, the Compose Message window will open. The menu bar and icons are shown at the top of the screen.
An image or images can be inserted in the document under Insert on the menu bar. An image or images can be sent as an attachment by using the Attach icon.
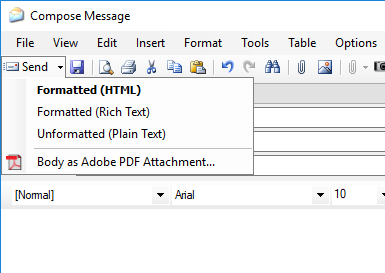
The document format (HTML, RTF, Plain, or Adobe PDF Attachment) can be selected by clicking on the drop-down arrow next to the Send icon.
You can select the e-mail account you want to use when sending email by clicking on the drop-down arrow at the Account field. This is saved per login name.
The following icons are on the Compose Message screen:
![]() Send – Click on the Send icon to send e-mail. Click on the drop-down arrow to select from Formatted (HTML), Formatted (Rich Text), Unformatted (Plain Text), and Adobe PDF Attachment.
Send – Click on the Send icon to send e-mail. Click on the drop-down arrow to select from Formatted (HTML), Formatted (Rich Text), Unformatted (Plain Text), and Adobe PDF Attachment.
- MOGO will automatically spell check your e-mail when you click on Send. If you click the [Cancel] button on the spell check screen, you will be asked if you want to send the e-mail without finishing spell check.
- The Adobe PDF Attachment will open the Adobe PDF Options screen in order to set up security for your PDF document. The e-mail will be sent with the PDF document as an attachment.
![]() Save to Drafts – To save the e-mail to the Drafts folder.
Save to Drafts – To save the e-mail to the Drafts folder.
![]() Cut – To delete and copy selected text.
Cut – To delete and copy selected text.
![]() Copy – To copy selected text.
Copy – To copy selected text.
![]() Paste – To paste text that has been copied.
Paste – To paste text that has been copied.
![]() Undo – To reverse or delete the last editing.
Undo – To reverse or delete the last editing.
![]() Redo – To reverse the action of the last undo.
Redo – To reverse the action of the last undo.
![]() Find – To search the text.
Find – To search the text.
![]() Attach File – Click on the Attach File icon to browse for an attachment through the file selection window.
Attach File – Click on the Attach File icon to browse for an attachment through the file selection window.
![]() Insert Image – If there is an image saved on your computer you wish to insert into the body of the email (not attach to the document), you would utilize this icon.
Insert Image – If there is an image saved on your computer you wish to insert into the body of the email (not attach to the document), you would utilize this icon.
![]() Attach MOGO Image from [patient name] – Click on the Attach MOGO Image icon to open the image cabinet for the selected patient. You can select an image or multiple images to attach to your e-mail.
Attach MOGO Image from [patient name] – Click on the Attach MOGO Image icon to open the image cabinet for the selected patient. You can select an image or multiple images to attach to your e-mail.
![]() Get images From Camera – Use this icon to insert images from a connected digital camera to the body of the email.
Get images From Camera – Use this icon to insert images from a connected digital camera to the body of the email.
![]() Check Spelling – To activate Spellcheck.
Check Spelling – To activate Spellcheck.
![]() Help – To go to MOGO’s Help.
Help – To go to MOGO’s Help.
The menu bar on the Compose Message screen is as follows:
File – Close and Save to Drafts
View – Normal, Page Layout, and Zoom (select percentage)
Edit – Undo, Redo, Cut, Copy, Paste, Delete, Select All, Find, Replace, Hyperlink, and Target
Insert – File Attachment. A file or image can be included as an attachment by clicking on File Attachment or by using the Attach icon in the toolbar. You can select multiple images directly from the patient’s Image Cabinet by selecting Attach MOGO Image from [patient name].
Tip: There is also an ![]() Attach MOGO Images icon in the toolbar.
Attach MOGO Images icon in the toolbar.
Format – Font, Tabs, Text Color, Text Background Color, and Document Background Color.
Tools – Spelling
Options – PDF will open the Adobe PDF Options screen in order to set up security for your PDF documents. PDF Documents are sent as an attachment by clicking on the drop-down arrow next to the Send/Receive icon.